Blog

  • qtrvsim

    QtRvSim–RISC-V CPU simulator for education

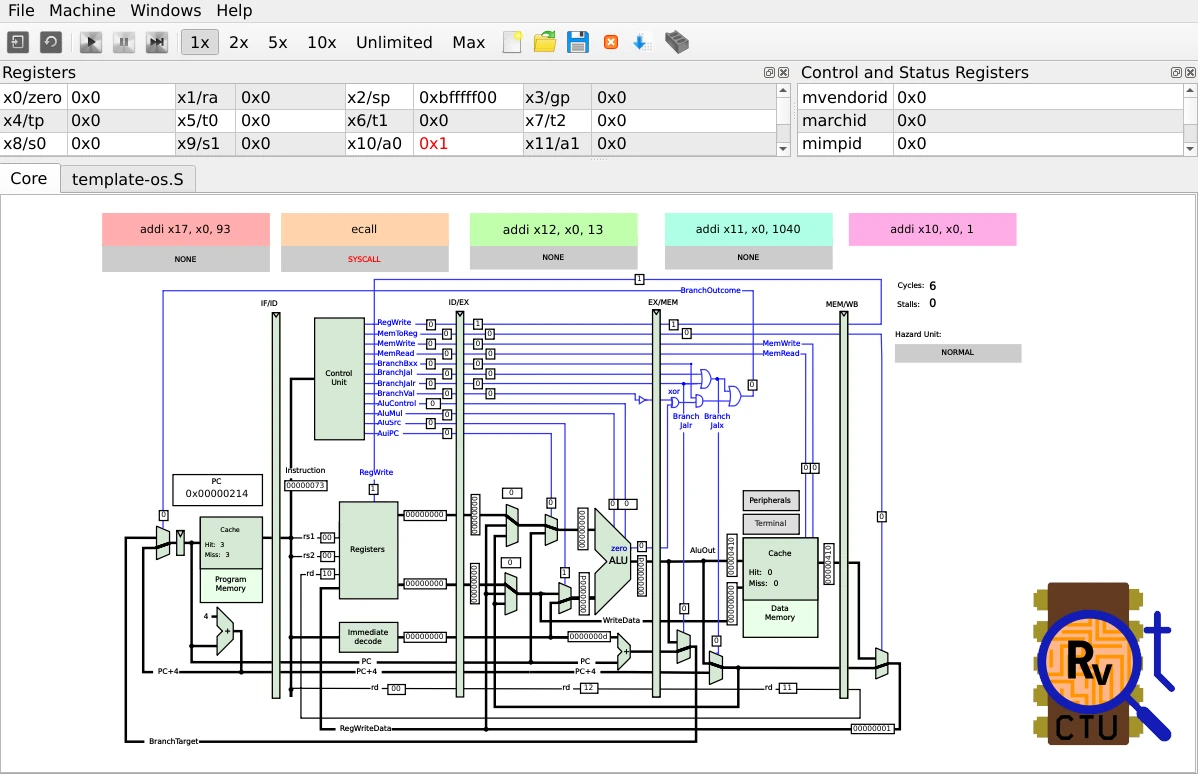
    QtRvSim screenshot

    Developed by the Computer Architectures Education project at Czech Technical University.

    Are you using QtRvSim at your organization? Please, let us know in the discussion!

    Table of contents

    Try it out! (WebAssembly)

    QtRVSim is experimentally available for WebAssembly and it can be run in most browsers without installation. QtRVSim online

    Note, that WebAssembly version is experimental. Please, report any difficulties via GitHub issues.

    Build and packages

    Packaging status

    build result

    Build Dependencies

    • Qt 5 (minimal tested version is 5.9.5), experimental support of Qt 6
    • elfutils (optional; libelf works too but there can be some problems)

    Quick Compilation on Linux

    On Linux, you can use a wrapper Makefile and run make in the project root directory. It will create a build directory and run CMake in it. Available targets are: release (default) and debug.

    Note for packagers: This Makefile is deleted by CMake when source archive is created to avoid any ambiguity. Packages should invoke CMake directly.

    General Compilation

    cmake -DCMAKE_BUILD_TYPE=Release /path/to/qtrvsim
    make

    Where /path/to/qtrvsim is path to this project root. The built binaries are to be found in the directory targetin the build directory (the one, where cmake was called).

    -DCMAKE_BUILD_TYPE=Debug builds development version including sanitizers.

    If no build type is supplied, Debug is the default.

    Building from source on macOS

    Install the latest version of Xcode from the App Store. Then open a terminal and execute xcode-select --install to install Command Line Tools. Then open Xcode, accept the license agreement and wait for it to install any additional components. After you finally see the “Welcome to Xcode” screen, from the top bar choose Xcode -> Preferences -> Locations -> Command Line Tools and select an SDK version.

    Install Homebrew and use it to install Qt. (macOS builds must use the bundled libelf)

    brew install qt

    Now build the project the same way as in general compilation (above).

    Download Binary Packages

    sudo add-apt-repository ppa:qtrvsimteam/ppa
    sudo apt-get update
    sudo apt-get install qtrvsim

    Nix package

    QtRVSim provides a Nix package as a part of the repository. You can build and install it by a command bellow. Updates have to be done manually by checking out the git. NIXPKGS package is in PR phase.

    nix-env -if .

    Tests

    Tests are managed by CTest (part of CMake). To build and run all tests, use this commands:

    cmake -DCMAKE_BUILD_TYPE=Release /path/to/QtRVSim
    make
    ctest

    Documentation

    Main documentation is provided in this README and in subdirectories docs/user and docs/developer.

    The project was developed and extended as theses of Karel Kočí, Jakub Dupak and Max Hollmann. See section Resources and Publications for links and references.

    Accepted Binary Formats

    The simulator accepts ELF statically linked executables compiled for RISC-V target (--march=rv64g). The simulator will automatically select endianness based on the ELF file header. Simulation will execute as XLEN=32 or XLEN=32 according to the ELF file header.

    • 64-bit RISC-V ISA RV64IM and 32-bit RV32IM ELF executables are supported.
    • Compressed instructions are not yet supported.

    You can use compile the code for simulation using specialized RISC-V GCC/Binutils toolchain (riscv32-elf) or using unified Clang/LLVM toolchain with LLD. If you have Clang installed, you don’t need any additional tools. Clang can be used on Linux, Windows, macOS and others…

    LLVM toolchain usage

    clang --target=riscv32 -march=rv32g -nostdlib -static -fuse-ld=lld test.S -o test
    llvm-objdump -S test

    GNU toolchain usage

    riscv32-elf-as test.S -o test.o
    riscv32-elf-ld test.o -o test
    riscv32-elf-objdump -S test

    or

    riscv32-elf-gcc test.S -o test
    riscv32-elf-objdump -S test

    GNU 64-bit toolchain use for RV32I target

    Multilib supporting 64-bit embedded toolchain can be used for to build executable

    riscv64-unknown-elf-gcc -march=rv32i -mabi=ilp32 -nostdlib -o test test.c crt0local.S -lgcc

    The global pointer and stack has to be set to setup runtime C code conformant environment. When no other C library is used then next simple crt0local.S can be used.

    example code
    /* minimal replacement of crt0.o which is else provided by C library */
    
    .globl main
    .globl _start
    .globl __start
    
    .option norelax
    
    .text
    
    __start:
    _start:
            .option push
            .option norelax
            la gp, __global_pointer$
            .option pop
            la      sp, __stack_end
            addi    a0, zero, 0
            addi    a1, zero, 0
            jal     main
    quit:
            addi    a0, zero, 0
            addi    a7, zero, 93  /* SYS_exit */
            ecall
    
    loop:   ebreak
            beq     zero, zero, loop
    
    .bss
    
    __stack_start:
            .skip   4096
    __stack_end:
    
    .end _start

    Integrated Assembler

    Basic integrated assembler is included in the simulator. Small subset of GNU assembler directives is recognized as well. Next directives are recognized: .word, .orig, .set /.equ, .ascii and .asciz. Some other directives are simply ignored: .data, .text, .globl, .end and .ent. This allows to write code which can be compiled by both – integrated and full-featured assembler. Addresses are assigned to labels/symbols which are stored in symbol table. Addition, subtraction, multiplication, divide and bitwise and or are recognized.

    Support to call external make utility

    The action “Build executable by external make” call “make” program. If the action is invoked, and some source editors selected in main windows tabs then the “make” is started in the corresponding directory. Else directory of last selected editor is chosen. If no editor is open then directory of last loaded ELF executable are used as “make” start path. If even that is not an option then default directory when the emulator has been started is used.

    Advanced functionalities

    Peripherals

    Emuated LCD, knobs, buttons, serial port, timer…

    The simulator implements emulation of two peripherals for now.

    The first is simple serial port (UART). It support transmission (Tx) and reception (Rx). Receiver status register (SERP_RX_ST_REG) implements two bits. Read-only bit 0 (SERP_RX_ST_REG_READY) is set to one if there is unread character available in the receiver data register (SERP_RX_DATA_REG). The bit 1 (SERP_RX_ST_REG_IE) can be written to 1 to enable interrupt request when unread character is available. The transmitter status register (SERP_TX_ST_REG) bit 0 (SERP_TX_ST_REG_READY) signals by value 1 that UART is ready and can accept next character to be sent. The bit 1 (SERP_TX_ST_REG_IE) enables generation of interrupt. The register SERP_TX_DATA_REG is actual Tx buffer. The LSB byte of written word is transmitted to the terminal window. Definition of peripheral base address and registers offsets (_o) and individual fields masks (_m) follows

    #define SERIAL_PORT_BASE   0xffffc000
    
    #define SERP_RX_ST_REG_o           0x00
    #define SERP_RX_ST_REG_READY_m      0x1
    #define SERP_RX_ST_REG_IE_m         0x2
    
    #define SERP_RX_DATA_REG_o         0x04
    
    #define SERP_TX_ST_REG_o           0x08
    #define SERP_TX_ST_REG_READY_m      0x1
    #define SERP_TX_ST_REG_IE_m         0x2
    
    #define SERP_TX_DATA_REG_o         0x0c
    

    The UART registers region is mirrored on the address 0xffff0000 to enable use of programs initially written for SPIM or MARS emulators.

    The another peripheral allows to set three byte values concatenated to single word (read-only KNOBS_8BIT register) from user panel set by knobs and display one word in hexadecimal, decimal and binary format (LED_LINE register). There are two other words writable which control color of RGB LED 1 and 2 (registers LED_RGB1 and LED_RGB2).

    #define SPILED_REG_BASE    0xffffc100
    
    #define SPILED_REG_LED_LINE_o           0x004
    #define SPILED_REG_LED_RGB1_o           0x010
    #define SPILED_REG_LED_RGB2_o           0x014
    #define SPILED_REG_LED_KBDWR_DIRECT_o   0x018
    
    #define SPILED_REG_KBDRD_KNOBS_DIRECT_o 0x020
    #define SPILED_REG_KNOBS_8BIT_o         0x024
    

    The simple 16-bit per pixel (RGB565) framebuffer and LCD are implemented. The framebuffer is mapped into range starting at LCD_FB_START address. The display size is 480 x 320 pixel. Pixel format RGB565 expect red component in bits 11.. 15, green component in bits 5..10 and blue component in bits 0..4.

    #define LCD_FB_START       0xffe00000
    #define LCD_FB_END         0xffe4afff
    

    The basic implementation of RISC-V Advanced Core Local Interruptor is implemented with basic support for

    • Machine-level Timer Device (MTIMER)
    • Machine-level Software Interrupt Device (MSWI)
    #define ACLINT_MSWI        0xfffd0000 // core 0 machine SW interrupt request
    #define ACLINT_MTIMECMP    0xfffd4000 // core 0 compare value
    #define ACLINT_MTIME       0xfffdbff8 // timer base 10 MHz
    #define ACLINT_SSWI        0xfffd0000 // core 0 system SW interrupt request
    

    More information about ACLINT can be found in RISC-V Advanced Core Local Interruptor Specification.

    Interrupts and Control and Status Registers

    Implemented CSR registers and their usage

    List of interrupt sources:

    Irq number mie / mip Bit Source
    3 3 Machine software interrupt request
    7 7 Machine timer interrupt
    16 16 There is received character ready to be read
    17 17 Serial port ready to accept character to Tx

    Following Control Status registers are recognized

    Number Name Description
    0x300 mstatus Machine status register.
    0x304 mie Machine interrupt-enable register.
    0x305 mtvec Machine trap-handler base address.
    0x340 mscratch Scratch register for machine trap handlers.
    0x341 mepc Machine exception program counter.
    0x342 mcause Machine trap cause.
    0x343 mtval Machine bad address or instruction.
    0x344 mip Machine interrupt pending.
    0x34A mtinsr Machine trap instruction (transformed).
    0x34B mtval2 Machine bad guest physical address.
    0xB00 mcycle Machine cycle counter.
    0xB02 minstret Machine instructions-retired counter.
    0xF11 mvendorid Vendor ID.
    0xF12 marchid Architecture ID.
    0xF13 mimpid Implementation ID.
    0xF14 mhardid Hardware thread ID.

    csrr, csrw, csrrs , csrrs and csrrw are used to copy and exchange value from/to RISC-V control status registers.

    Sequence to enable serial port receive interrupt:

    Decide location of interrupt service routine the first. The address of the common trap handler is defined by mtvec register and then PC is set to this address when exception or interrupt is accepted.

    Enable bit 16 in the machine Interrupt-Enable register (mie). Ensure that bit 3 (mstatus.mie – machine global interrupt-enable) of Machine Status register is set to one.

    Enable interrupt in the receiver status register (bit 1 of SERP_RX_ST_REG).

    Write character to the terminal. It should be immediately consumed by the serial port receiver if interrupt is enabled in SERP_RX_ST_REG. CPU should report interrupt exception and when it propagates to the execution phase PC is set to the interrupt routine start address.

    System Calls Support

    Syscall table and documentation

    The emulator includes support for a few Linux kernel system calls. The RV32G ilp32 ABI is used.

    Register use on input use on output Calling Convention
    zero (x0) Hard-wired zero
    ra (x1) (preserved) Return address
    sp (x2) (callee saved) Stack pointer
    gp (x3) (preserved) Global pointer
    tp (x4) (preserved) Thread pointer
    t0 .. t2 (x5 .. x7) Temporaries
    s0/fp (x8) (callee saved) Saved register/frame pointer
    s1 (x9) (callee saved) Saved register
    a0 (x10) 1st syscall argument return value Function argument/return value
    a1 (x11) 2nd syscall argument Function argument/return value
    a2 .. a5 (x12 .. x15) syscall arguments Function arguments
    a6 (x16) Function arguments
    a7 (x17) syscall number Function arguments
    s2 .. s11 (x18 .. x27) (callee saved) Saved registers
    t3 .. t6 (x28 .. x31) Temporaries

    The all system call input arguments are passed in register.

    Supported syscalls:

    void exit(int status) __NR_exit (93)

    Stop/end execution of the program. The argument is exit status code, zero means OK, other values informs about error.

    ssize_t read(int fd, void *buf, size_t count) __NR_read (63)

    Read count bytes from open file descriptor fd. The emulator maps file descriptors 0, 1 and 2 to the internal terminal/console emulator. They can be used without open call. If there are no more characters to read from the console, newline is appended. At most the count bytes read are stored to the memory location specified by buf argument. Actual number of read bytes is returned.

    ssize_t write(int fd, const void *buf, size_t count) __NR_write (64)

    Write count bytes from memory location buf to the open file descriptor fd. The same about console for file handles 0, 1 and 2 is valid as for read.

    int close(int fd) __NR_close (57)

    Close file associated to descriptor fd and release descriptor.

    int openat(int dirfd, const char *pathname, int flags, mode_t mode) __NR_openat (56)

    Open file and associate it with the first unused file descriptor number and return that number. If the option OS Emulation->Filesystem root is not empty then the file path pathname received from emulated environment is appended to the path specified by Filesystem root. The host filesystem is protected against attempt to traverse to random directory by use of .. path elements. If the root is not specified then all open files are targetted to the emulated terminal. Only TARGET_AT_FDCWD (dirfd = -100) mode is supported.

    void * brk(void *addr) __NR_brk (214)

    Set end of the area used by standard heap after end of the program data/bss. The syscall is emulated by dummy implementation. Whole address space up to 0xffff0000 is backuped by automatically attached RAM.

    int ftruncate(int fd, off_t length) __NR_truncate (46)

    Set length of the open file specified by fd to the new length. The length argument is 64-bit even on 32-bit system and it is passed as the lower part and the higher part in the second and third argument.

    ssize_t readv(int fd, const struct iovec *iov, int iovcnt) __NR_Linux (65)

    The variant of read system call where data to read are would be stored to locations specified by iovcnt pairs of base address, length pairs stored in memory at address pass in iov.

    ssize_t writev(int fd, const struct iovec *iov, int iovcnt) __NR_Linux (66)

    The variant of write system call where data to write are defined by iovcnt pairs of base address, length pairs stored in memory at address pass in iov.

    Limitations of the Implementation

    • See list of currently supported instructions.

    QtRvSim limitations

    • Only very minimal support for privileged instruction is implemented for now (mret).
    • Only machine mode and minimal subset of machine CSRs is implemented.
    • TLB and virtual memory are not implemented.
    • No floating point support
    • Memory access stall (stalling execution because of cache miss would be pretty annoying for users so difference between cache and memory is just in collected statistics)
    • Only limited support for interrupts and exceptions. When ecall instruction is recognized, small subset of the Linux kernel system calls can be emulated or simulator can be configured to continue by trap handler on mtvec address.

    List of Currently Supported Instructions

    • RV32I:
      • LOAD: lw, lh, lb, lwu, lhu, lbu
      • STORE: sw, sh, sb, swu, shu, sbu
      • OP: add, sub, sll, slt, sltu, xor, srl, sra, or, and
      • MISC-MEM: fence, fence.i
      • OP-IMM: addi, sll, slti, sltiu, xori, srli, srai, ori, andi, auipc, lui
      • BRANCH: beq, bne, btl, bge, bltu, bgtu
      • JUMP: jal, jalr
      • SYSTEM: ecall, mret, ebreak, csrrw, csrrs, csrrc, csrrwi, csrrsi, csrrci
    • RV64I:
      • LOAD/STORE: lwu, ld, sd
      • OP-32: addw, subw, sllw, srlw, sraw, or, and
      • OP-IMM-32: addiw, sllw, srliw, sraiw
    • Pseudoinstructions
      • BASIC: nop
      • LOAD: la, li,
      • OP: mv, not, neg, negw, sext.b, sext.h, sext.w, zext.b, zext.h, zext.w, seqz, snez, sltz, slgz
      • BRANCH: beqz, bnez, blez, bgez, bltz, bgtz, bgt, ble, bgtu, bleu
      • JUMP: j, jal, jr, jalr, ret, call, tail
    • Extensions
      • RV32M/RV64M: mul, mulh, mulhsu, div, divu, rem, remu
      • RV64M: mulw, divw, divuw, remw, remuw
      • RV32A/RV64A: lr.w, sc.w, amoswap.w, amoadd.w, amoxor.w, amoand.w, amoor.w, amomin.w, amomax.w, amominu.w, amomaxu.w
      • RV64A: lr.d, sc.d, amoswap.d, amoadd.d, amoxor.d, amoand.d, amoor.d, amomin.d, amomax.d, amominu.d, amomaxu.d
      • Zicsr: csrrw, csrrs, csrrc, csrrwi, csrrsi, csrrci

    For details about RISC-V, refer to the ISA specification: https://riscv.org/technical/specifications/.

    Links to Resources and Similar Projects

    Resources and Publications

    Please reference above article, if you use QtRvSim in education or research related materials and publications.

    Projects

    Copyright

    License

    This project is licensed under GPL-3.0-or-later. The full text of the license is in the LICENSE file. The license applies to all files except for directories named external and files in them. Files in external directories have a separate license compatible with the projects license.

    This program is free software: you can redistribute it and/or modify it under the terms of the GNU General Public License as published by the Free Software Foundation, either version 3 of the License, or (at your option) any later version.

    This program is distributed in the hope that it will be useful, but WITHOUT ANY WARRANTY; without even the implied warranty of MERCHANTABILITY or FITNESS FOR A PARTICULAR PURPOSE. See the GNU General Public License for more details.

    You should have received a copy of the GNU General Public License along with this program. If not, see https://www.gnu.org/licenses/.

    Faculty of Electrical Engineering Faculty of Information Technology Czech Technical University

    Visit original content creator repository https://github.com/cvut/qtrvsim
  • qtrvsim

    QtRvSim–RISC-V CPU simulator for education

    QtRvSim screenshot

    Developed by the Computer Architectures Education project
    at Czech Technical University.

    Are you using QtRvSim at your organization? Please, let us know in the discussion!

    Table of contents

    Try it out! (WebAssembly)

    QtRVSim is experimentally available for WebAssembly and it can be run in most browsers
    without installation. QtRVSim online

    Note, that WebAssembly version is experimental.
    Please, report any difficulties via GitHub issues.

    Build and packages

    Packaging status

    build result

    Build Dependencies

    • Qt 5 (minimal tested version is 5.9.5), experimental support of Qt 6
    • elfutils (optional; libelf works too but there can be some problems)

    Quick Compilation on Linux

    On Linux, you can use a wrapper Makefile and run make in the project root directory. It will create a build directory
    and run CMake in it. Available targets are: release (default) and debug.

    Note for packagers: This Makefile is deleted by CMake when source archive is created to avoid any ambiguity. Packages
    should invoke CMake directly.

    General Compilation

    cmake -DCMAKE_BUILD_TYPE=Release /path/to/qtrvsim
    make

    Where /path/to/qtrvsim is path to this project root. The built binaries are to be found in the directory targetin
    the build directory (the one, where cmake was called).

    -DCMAKE_BUILD_TYPE=Debug builds development version including sanitizers.

    If no build type is supplied, Debug is the default.

    Building from source on macOS

    Install the latest version of Xcode from the App Store. Then open a terminal and execute xcode-select --install to
    install Command Line Tools. Then open Xcode, accept the license agreement and wait for it to install any additional
    components. After you finally see the “Welcome to Xcode” screen, from the top bar
    choose Xcode -> Preferences -> Locations -> Command Line Tools and select an SDK version.

    Install Homebrew and use it to install Qt. (macOS builds must use the bundled libelf)

    brew install qt

    Now build the project the same way as in general compilation (above).

    Download Binary Packages

    sudo add-apt-repository ppa:qtrvsimteam/ppa
    sudo apt-get update
    sudo apt-get install qtrvsim

    Nix package

    QtRVSim provides a Nix package as a part of the repository. You can build and install it by a command bellow. Updates
    have to be done manually by checking out the git. NIXPKGS package is in PR phase.

    nix-env -if .

    Tests

    Tests are managed by CTest (part of CMake). To build and run all tests, use this commands:

    cmake -DCMAKE_BUILD_TYPE=Release /path/to/QtRVSim
    make
    ctest

    Documentation

    Main documentation is provided in this README and in subdirectories docs/user
    and docs/developer.

    The project was developed and extended as theses of Karel Kočí, Jakub Dupak and Max Hollmann. See section Resources and Publications for links and references.

    Accepted Binary Formats

    The simulator accepts ELF statically linked executables compiled for RISC-V target (--march=rv64g).
    The simulator will automatically select endianness based on the ELF file header.
    Simulation will execute as XLEN=32 or XLEN=32 according to the ELF file header.

    • 64-bit RISC-V ISA RV64IM and 32-bit RV32IM ELF executables are supported.
    • Compressed instructions are not yet supported.

    You can use compile the code for simulation using specialized RISC-V GCC/Binutils toolchain (riscv32-elf) or using
    unified Clang/LLVM toolchain with LLD. If you have Clang installed, you don’t need any
    additional tools. Clang can be used on Linux, Windows, macOS and others…

    LLVM toolchain usage

    clang --target=riscv32 -march=rv32g -nostdlib -static -fuse-ld=lld test.S -o test
    llvm-objdump -S test

    GNU toolchain usage

    riscv32-elf-as test.S -o test.o
    riscv32-elf-ld test.o -o test
    riscv32-elf-objdump -S test

    or

    riscv32-elf-gcc test.S -o test
    riscv32-elf-objdump -S test

    GNU 64-bit toolchain use for RV32I target

    Multilib supporting 64-bit embedded toolchain can be used for to build executable

    riscv64-unknown-elf-gcc -march=rv32i -mabi=ilp32 -nostdlib -o test test.c crt0local.S -lgcc

    The global pointer and stack has to be set to setup runtime C code conformant environment. When no other C library is
    used then next simple crt0local.S can be used.

    example code

    /* minimal replacement of crt0.o which is else provided by C library */
    
    .globl main
    .globl _start
    .globl __start
    
    .option norelax
    
    .text
    
    __start:
    _start:
            .option push
            .option norelax
            la gp, __global_pointer$
            .option pop
            la      sp, __stack_end
            addi    a0, zero, 0
            addi    a1, zero, 0
            jal     main
    quit:
            addi    a0, zero, 0
            addi    a7, zero, 93  /* SYS_exit */
            ecall
    
    loop:   ebreak
            beq     zero, zero, loop
    
    .bss
    
    __stack_start:
            .skip   4096
    __stack_end:
    
    .end _start

    Integrated Assembler

    Basic integrated assembler is included in the simulator. Small subset of
    GNU assembler directives is recognized as well. Next directives are
    recognized: .word, .orig, .set
    /.equ, .ascii and .asciz. Some other directives are simply ignored: .data, .text, .globl, .end and .ent.
    This allows to write code which can be compiled by both – integrated and full-featured assembler. Addresses are assigned
    to labels/symbols which are stored in symbol table. Addition, subtraction, multiplication, divide and bitwise and or are
    recognized.

    Support to call external make utility

    The action “Build executable by external make” call “make” program. If the action is invoked, and some source editors
    selected in main windows tabs then the “make” is started in the corresponding directory. Else directory of last selected
    editor is chosen. If no editor is open then directory of last loaded ELF executable are used as “make” start path. If
    even that is not an option then default directory when the emulator has been started is used.

    Advanced functionalities

    Peripherals

    Emuated LCD, knobs, buttons, serial port, timer…

    The simulator implements emulation of two peripherals for now.

    The first is simple serial port (UART). It support transmission
    (Tx) and reception (Rx). Receiver status register (SERP_RX_ST_REG)
    implements two bits. Read-only bit 0 (SERP_RX_ST_REG_READY)
    is set to one if there is unread character available in the receiver data register (SERP_RX_DATA_REG). The bit 1
    (SERP_RX_ST_REG_IE) can be written to 1 to enable interrupt request when unread character is available. The
    transmitter status register (SERP_TX_ST_REG) bit 0
    (SERP_TX_ST_REG_READY) signals by value 1 that UART is ready and can accept next character to be sent. The bit 1
    (SERP_TX_ST_REG_IE) enables generation of interrupt. The register SERP_TX_DATA_REG is actual Tx buffer. The LSB byte
    of written word is transmitted to the terminal window. Definition of peripheral base address and registers
    offsets (_o) and individual fields masks (_m) follows

    #define SERIAL_PORT_BASE   0xffffc000
    
    #define SERP_RX_ST_REG_o           0x00
    #define SERP_RX_ST_REG_READY_m      0x1
    #define SERP_RX_ST_REG_IE_m         0x2
    
    #define SERP_RX_DATA_REG_o         0x04
    
    #define SERP_TX_ST_REG_o           0x08
    #define SERP_TX_ST_REG_READY_m      0x1
    #define SERP_TX_ST_REG_IE_m         0x2
    
    #define SERP_TX_DATA_REG_o         0x0c
    

    The UART registers region is mirrored on the address 0xffff0000 to enable use of programs initially written
    for SPIM or MARS
    emulators.

    The another peripheral allows to set three byte values concatenated to single word (read-only KNOBS_8BIT register)
    from user panel set by knobs and display one word in hexadecimal, decimal and binary format (LED_LINE register). There
    are two other words writable which control color of RGB LED 1 and 2
    (registers LED_RGB1 and LED_RGB2).

    #define SPILED_REG_BASE    0xffffc100
    
    #define SPILED_REG_LED_LINE_o           0x004
    #define SPILED_REG_LED_RGB1_o           0x010
    #define SPILED_REG_LED_RGB2_o           0x014
    #define SPILED_REG_LED_KBDWR_DIRECT_o   0x018
    
    #define SPILED_REG_KBDRD_KNOBS_DIRECT_o 0x020
    #define SPILED_REG_KNOBS_8BIT_o         0x024
    

    The simple 16-bit per pixel (RGB565) framebuffer and LCD are implemented. The framebuffer is mapped into range starting
    at LCD_FB_START address. The display size is 480 x 320 pixel. Pixel format RGB565 expect red component in bits 11..
    15, green component in bits 5..10 and blue component in bits 0..4.

    #define LCD_FB_START       0xffe00000
    #define LCD_FB_END         0xffe4afff
    

    The basic implementation of RISC-V Advanced Core Local Interruptor
    is implemented with basic support for

    • Machine-level Timer Device (MTIMER)
    • Machine-level Software Interrupt Device (MSWI)

    #define ACLINT_MSWI        0xfffd0000 // core 0 machine SW interrupt request
    #define ACLINT_MTIMECMP    0xfffd4000 // core 0 compare value
    #define ACLINT_MTIME       0xfffdbff8 // timer base 10 MHz
    #define ACLINT_SSWI        0xfffd0000 // core 0 system SW interrupt request
    

    More information about ACLINT can be found in RISC-V Advanced Core Local Interruptor Specification.

    Interrupts and Control and Status Registers

    Implemented CSR registers and their usage

    List of interrupt sources:

    Irq number mie / mip Bit Source
    3 3 Machine software interrupt request
    7 7 Machine timer interrupt
    16 16 There is received character ready to be read
    17 17 Serial port ready to accept character to Tx

    Following Control Status registers are recognized

    Number Name Description
    0x300 mstatus Machine status register.
    0x304 mie Machine interrupt-enable register.
    0x305 mtvec Machine trap-handler base address.
    0x340 mscratch Scratch register for machine trap handlers.
    0x341 mepc Machine exception program counter.
    0x342 mcause Machine trap cause.
    0x343 mtval Machine bad address or instruction.
    0x344 mip Machine interrupt pending.
    0x34A mtinsr Machine trap instruction (transformed).
    0x34B mtval2 Machine bad guest physical address.
    0xB00 mcycle Machine cycle counter.
    0xB02 minstret Machine instructions-retired counter.
    0xF11 mvendorid Vendor ID.
    0xF12 marchid Architecture ID.
    0xF13 mimpid Implementation ID.
    0xF14 mhardid Hardware thread ID.

    csrr, csrw, csrrs , csrrs and csrrw are used to copy and exchange value from/to RISC-V control status registers.

    Sequence to enable serial port receive interrupt:

    Decide location of interrupt service routine the first. The address of the common trap handler is defined by mtvec register and then PC is set to this address when exception or interrupt is accepted.

    Enable bit 16 in the machine Interrupt-Enable register (mie). Ensure that bit 3 (mstatus.mie – machine global interrupt-enable) of Machine Status register is set to one.

    Enable interrupt in the receiver status register (bit 1 of SERP_RX_ST_REG).

    Write character to the terminal. It should be immediately consumed by the serial port receiver if interrupt is enabled
    in SERP_RX_ST_REG. CPU should report interrupt exception and when it propagates to the execution phase PC is set to
    the interrupt routine start address.

    System Calls Support

    Syscall table and documentation

    The emulator includes support for a few Linux kernel system calls. The RV32G ilp32 ABI is used.

    Register use on input use on output Calling Convention
    zero (x0) Hard-wired zero
    ra (x1) (preserved) Return address
    sp (x2) (callee saved) Stack pointer
    gp (x3) (preserved) Global pointer
    tp (x4) (preserved) Thread pointer
    t0 .. t2 (x5 .. x7) Temporaries
    s0/fp (x8) (callee saved) Saved register/frame pointer
    s1 (x9) (callee saved) Saved register
    a0 (x10) 1st syscall argument return value Function argument/return value
    a1 (x11) 2nd syscall argument Function argument/return value
    a2 .. a5 (x12 .. x15) syscall arguments Function arguments
    a6 (x16) Function arguments
    a7 (x17) syscall number Function arguments
    s2 .. s11 (x18 .. x27) (callee saved) Saved registers
    t3 .. t6 (x28 .. x31) Temporaries

    The all system call input arguments are passed in register.

    Supported syscalls:

    void exit(int status) __NR_exit (93)

    Stop/end execution of the program. The argument is exit status code, zero means OK, other values informs about error.

    ssize_t read(int fd, void *buf, size_t count) __NR_read (63)

    Read count bytes from open file descriptor fd. The emulator maps file descriptors 0, 1 and 2 to the internal
    terminal/console emulator. They can be used without open call. If there are no more characters to read from the
    console, newline is appended. At most the count bytes read are stored to the memory location specified by buf
    argument. Actual number of read bytes is returned.

    ssize_t write(int fd, const void *buf, size_t count) __NR_write (64)

    Write count bytes from memory location buf to the open file descriptor
    fd. The same about console for file handles 0, 1 and 2 is valid as for read.

    int close(int fd) __NR_close (57)

    Close file associated to descriptor fd and release descriptor.

    int openat(int dirfd, const char *pathname, int flags, mode_t mode) __NR_openat (56)

    Open file and associate it with the first unused file descriptor number and return that number. If the
    option OS Emulation->Filesystem root
    is not empty then the file path pathname received from emulated environment is appended to the path specified
    by Filesystem root. The host filesystem is protected against attempt to traverse to random directory by use of ..
    path elements. If the root is not specified then all open files are targetted to the emulated terminal. Only TARGET_AT_FDCWD (dirfd = -100) mode is supported.

    void * brk(void *addr) __NR_brk (214)

    Set end of the area used by standard heap after end of the program data/bss. The syscall is emulated by dummy
    implementation. Whole address space up to 0xffff0000 is backuped by automatically attached RAM.

    int ftruncate(int fd, off_t length) __NR_truncate (46)

    Set length of the open file specified by fd to the new length. The length
    argument is 64-bit even on 32-bit system and it is passed as the lower part and the higher part in the
    second and third argument.

    ssize_t readv(int fd, const struct iovec *iov, int iovcnt) __NR_Linux (65)

    The variant of read system call where data to read are would be stored to locations specified by iovcnt pairs of
    base address, length pairs stored in memory at address pass in iov.

    ssize_t writev(int fd, const struct iovec *iov, int iovcnt) __NR_Linux (66)

    The variant of write system call where data to write are defined by iovcnt
    pairs of base address, length pairs stored in memory at address pass in iov.

    Limitations of the Implementation

    • See list of currently supported instructions.

    QtRvSim limitations

    • Only very minimal support for privileged instruction is implemented for now (mret).
    • Only machine mode and minimal subset of machine CSRs is implemented.
    • TLB and virtual memory are not implemented.
    • No floating point support
    • Memory access stall (stalling execution because of cache miss would be pretty annoying for users so difference between
      cache and memory is just in collected statistics)
    • Only limited support for interrupts and exceptions. When ecall
      instruction is recognized, small subset of the Linux kernel system calls
      can be emulated or simulator can be configured to continue by trap handler
      on mtvec address.

    List of Currently Supported Instructions

    • RV32I:
      • LOAD: lw, lh, lb, lwu, lhu, lbu
      • STORE: sw, sh, sb, swu, shu, sbu
      • OP: add, sub, sll, slt, sltu, xor, srl, sra, or, and
      • MISC-MEM: fence, fence.i
      • OP-IMM: addi, sll, slti, sltiu, xori, srli, srai, ori, andi, auipc, lui
      • BRANCH: beq, bne, btl, bge, bltu, bgtu
      • JUMP: jal, jalr
      • SYSTEM: ecall, mret, ebreak, csrrw, csrrs, csrrc, csrrwi, csrrsi, csrrci
    • RV64I:
      • LOAD/STORE: lwu, ld, sd
      • OP-32: addw, subw, sllw, srlw, sraw, or, and
      • OP-IMM-32: addiw, sllw, srliw, sraiw
    • Pseudoinstructions
      • BASIC: nop
      • LOAD: la, li,
      • OP: mv, not, neg, negw, sext.b, sext.h, sext.w, zext.b, zext.h, zext.w, seqz, snez, sltz, slgz
      • BRANCH: beqz, bnez, blez, bgez, bltz, bgtz, bgt, ble, bgtu, bleu
      • JUMP: j, jal, jr, jalr, ret, call, tail
    • Extensions
      • RV32M/RV64M: mul, mulh, mulhsu, div, divu, rem, remu
      • RV64M: mulw, divw, divuw, remw, remuw
      • RV32A/RV64A: lr.w, sc.w, amoswap.w, amoadd.w, amoxor.w, amoand.w, amoor.w, amomin.w, amomax.w, amominu.w, amomaxu.w
      • RV64A: lr.d, sc.d, amoswap.d, amoadd.d, amoxor.d, amoand.d, amoor.d, amomin.d, amomax.d, amominu.d, amomaxu.d
      • Zicsr: csrrw, csrrs, csrrc, csrrwi, csrrsi, csrrci

    For details about RISC-V, refer to the ISA specification:
    https://riscv.org/technical/specifications/.

    Links to Resources and Similar Projects

    Resources and Publications

    Please reference above article, if you use QtRvSim in education or research related materials and publications.

    Projects

    Copyright

    License

    This project is licensed under GPL-3.0-or-later. The full text of the license is in the LICENSE file. The
    license applies to all files except for directories named external and files in them. Files in external directories
    have a separate license compatible with the projects license.

    This program is free software: you can redistribute it and/or modify it under the terms of the GNU General Public License as published by the Free Software Foundation, either version 3 of the License, or (at your option) any later version.

    This program is distributed in the hope that it will be useful, but WITHOUT ANY WARRANTY; without even the implied warranty of MERCHANTABILITY or FITNESS FOR A PARTICULAR PURPOSE. See the GNU General Public License for more details.

    You should have received a copy of the GNU General Public License along with this program. If not, see https://www.gnu.org/licenses/.

    Faculty of Electrical Engineering Faculty of Information Technology Czech Technical University

    Visit original content creator repository
    https://github.com/cvut/qtrvsim

  • Django-based-Website-Code-generation-with-RAG-Llama3-Multi-AGI-of-Software-development-WebApp

    Django-based-Website-Code-generation-with-RAG-Llama3-Multi-AGI-of-Software-development-WebApp

    Overview

    The Django-based-Website-Code-generation-with-RAG-Llama3-Multi-AGI-of-Software-development leverages advanced technologies and specialized agents to streamline the entire software development lifecycle. This system is designed to enhance processes from client requirement gathering to the final product deployment, utilizing a core component — the Llama3 RAG-Based System — for improved response accuracy and generation through advanced Natural Language Processing (NLP) and Information Retrieval capabilities. this repository have the apis and Django-based-Website-Code-generation-with-RAG-Llama3-Multi-AGI-of-Software-development django based Web Application.

    Key Components

    • Django Based Web Application and Rest Apis: For user experience Django base Web Application is develop with two tier django based web application and rest apis
    • Client Requirement Gathering: Ensures a thorough understanding of client needs, providing a foundation for the project.
    • Llama3 RAG-Based System: Enhances response generation accuracy and relevance by combining Llama3’s NLP capabilities with a Retrieval-Augmented Generation (RAG) system.
    • Business Analysis Agent: Translates business requirements into actionable insights for technical implementation.
    • Software Architect Agent: Designs a scalable and robust software architecture.
    • Software Developer Agent: Implements Django-based operations including CRUD functionalities and static HTML code.
    • Django Web App Development: Provides a web application with user authentication and a project code generation dashboard.
    • Testing Agent: Performs rigorous software testing to ensure that the final product meets all specified requirements.
    • QA Agent: Manages the deployment and multi-platform configuration of the application.

    Features

    • Client Requirement Gathering: Detailed client interviews and surveys, followed by comprehensive documentation of functional and non-functional requirements.
    • Llama3 RAG System: Integrates information retrieval to boost the accuracy of the Llama3 NLP model, improving overall system response.
    • Django Web App Development: A user-friendly web application with robust authentication and a code generation dashboard.
    • Testing & QA: Continuous testing and quality assurance to ensure the final product’s reliability and functionality across different platforms.

    System Architecture

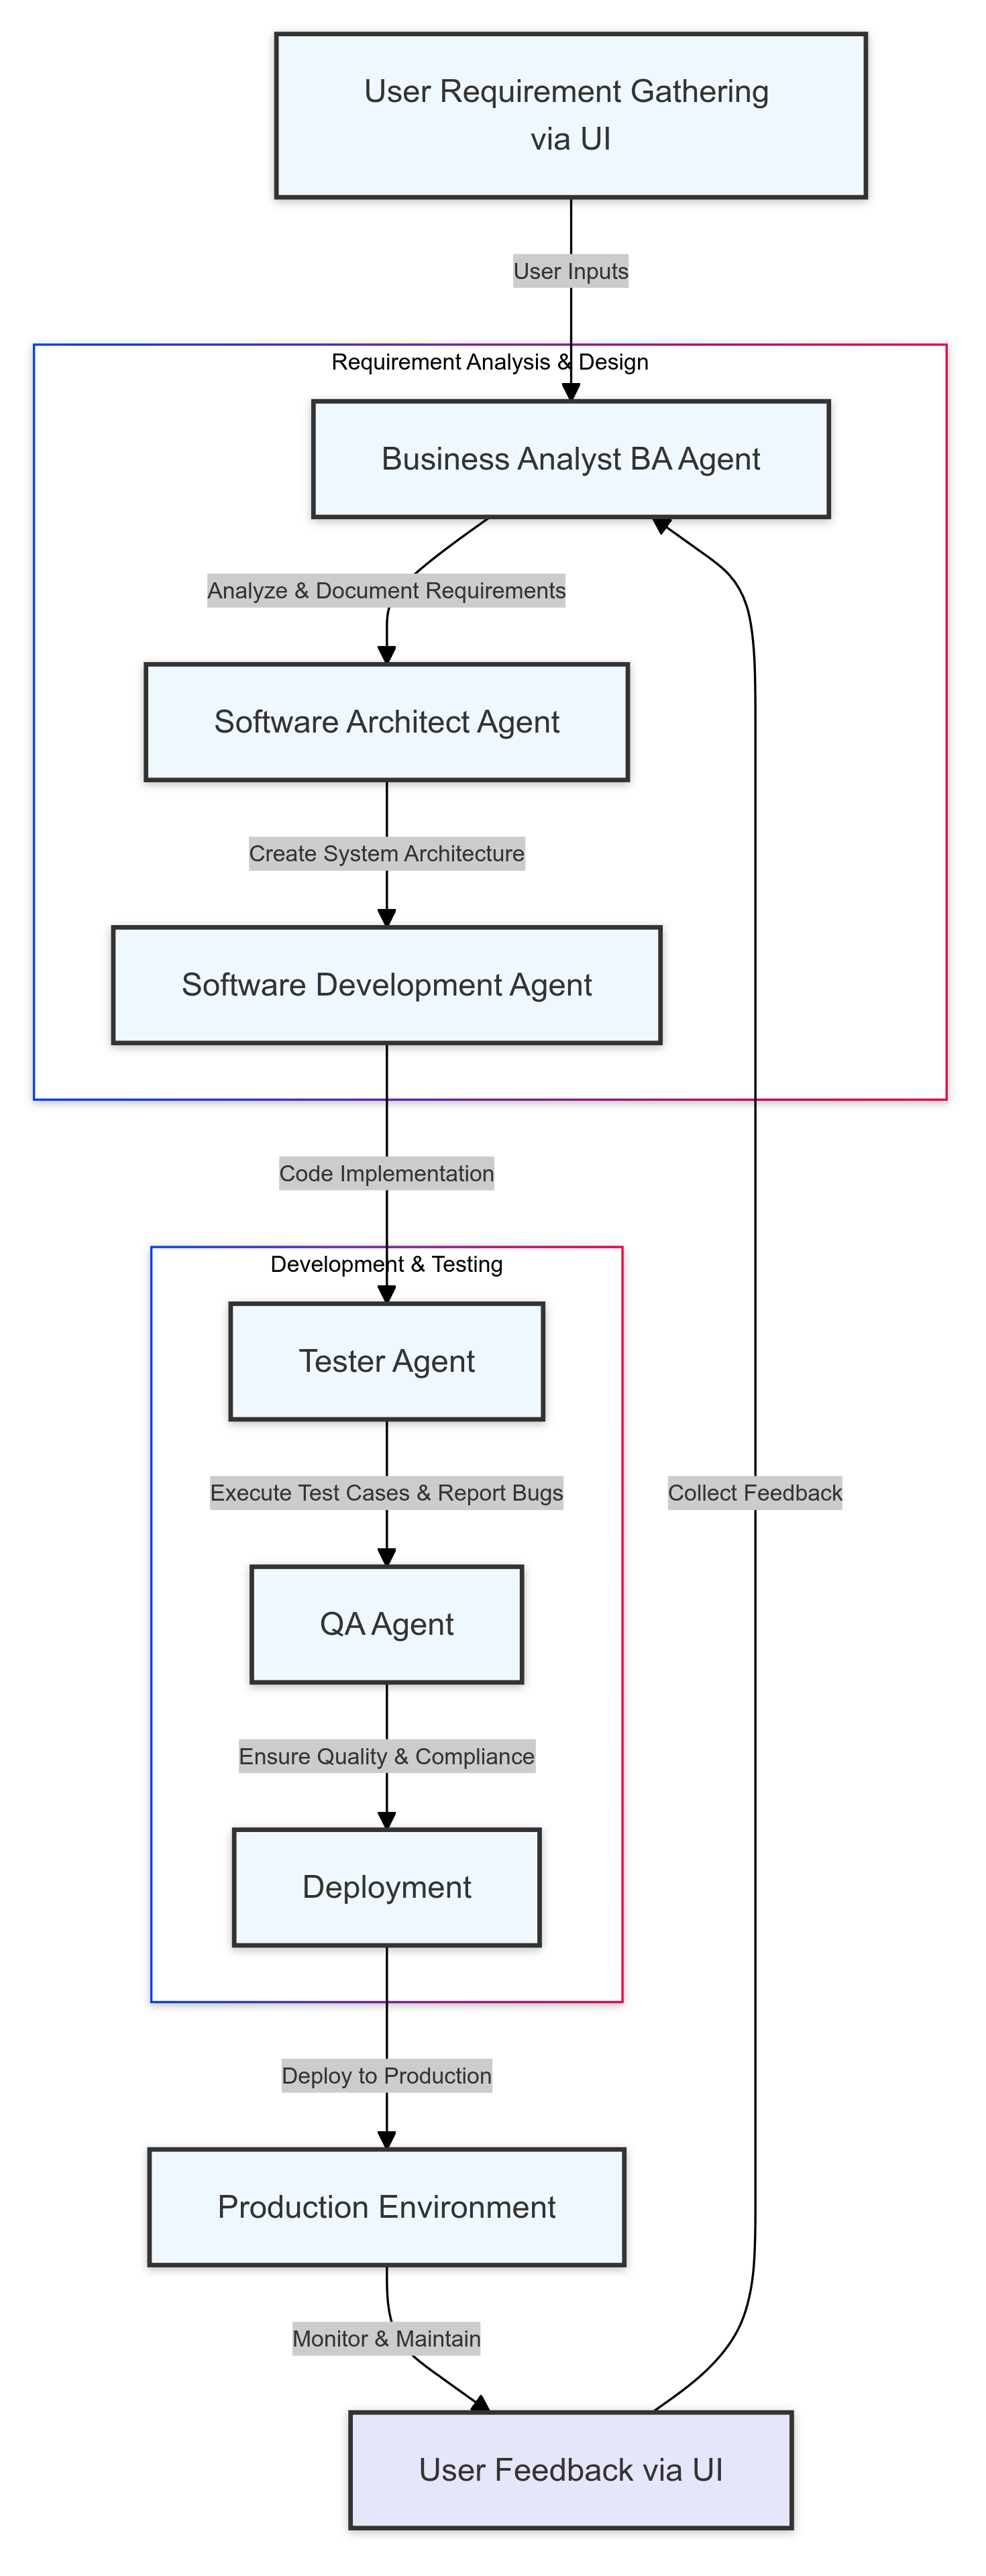
    sda diagram-2024-08-13-135719

    1. Client Requirement Gathering:

      • Conducts client interviews and surveys to capture detailed requirements.
      • Documents functional and non-functional specifications.
    2. Llama3 RAG-Based System:

      • Enhances natural language processing using Llama3 integrated with a RAG system.
      • Provides accurate, context-aware responses.
    3. Business Analysis Agent:

      • Analyzes business workflows and creates detailed requirement documents.
    4. Software Architect Agent:

      • Designs the software’s architecture for performance and scalability.
    5. Software Developer Agent:

      • Implements Django CRUD operations and static HTML for front-end functionality.
    6. Testing Agent:

      • Conducts unit, integration, and system testing to ensure software quality.
    7. QA Agent:

      • Oversees the deployment and configuration of the system across various platforms and programming languages.

    Challenges Addressed

    • Improved CSS Handling: The system addresses limitations in CSS handling by training the models with diverse project scenarios.
    • Hardware Costs: High-performance hardware is required for the Llama3 RAG system, including GPUs, RAM, and cooling solutions.

    Hardware Requirements

    • Compute Requirements:

      • GPUs: 8 GPUs recommended (NVIDIA A100/V100).
      • RAM: 256 GB recommended.
      • Storage: 4 TB NVMe SSD.
    • Total Hardware Cost: Approximately $124,000, covering GPUs, RAM, storage, networking equipment, cooling solutions, and power supply.

    Deployment & Configuration

    • Deployment Phase:

      • Overseen by the QA Agent for smooth transition to production environments.
    • Configuration Phase:

      • Ensures compatibility with multiple platforms and environments.

    Demostration


    bandicam.2024-07-30.17-51-10-659.mp4


    Conclusion

    The Django-based-Website-Code-generation-with-RAG-Llama3-Multi-AGI-of-Software-development is a robust solution for automating the entire software development process. By leveraging cutting-edge AI technologies and specialized agents, this system ensures that projects are completed efficiently and to a high standard of quality. It addresses real-world development challenges and provides a cost-effective solution for implementing AI-enhanced software architectures.

    Visit original content creator repository
    https://github.com/AlinaBaber/Django-based-Website-Code-generation-with-RAG-Llama3-Multi-AGI-of-Software-development-WebApp

  • mokup-3D-latinha_Bauhaus

    Getting Started with Create React App

    This project was bootstrapped with Create React App.

    Available Scripts

    In the project directory, you can run:

    npm start

    Runs the app in the development mode.
    Open http://localhost:3000 to view it in your browser.

    The page will reload when you make changes.
    You may also see any lint errors in the console.

    npm test

    Launches the test runner in the interactive watch mode.
    See the section about running tests for more information.

    npm run build

    Builds the app for production to the build folder.
    It correctly bundles React in production mode and optimizes the build for the best performance.

    The build is minified and the filenames include the hashes.
    Your app is ready to be deployed!

    See the section about deployment for more information.

    npm run eject

    Note: this is a one-way operation. Once you eject, you can’t go back!

    If you aren’t satisfied with the build tool and configuration choices, you can eject at any time. This command will remove the single build dependency from your project.

    Instead, it will copy all the configuration files and the transitive dependencies (webpack, Babel, ESLint, etc) right into your project so you have full control over them. All of the commands except eject will still work, but they will point to the copied scripts so you can tweak them. At this point you’re on your own.

    You don’t have to ever use eject. The curated feature set is suitable for small and middle deployments, and you shouldn’t feel obligated to use this feature. However we understand that this tool wouldn’t be useful if you couldn’t customize it when you are ready for it.

    Learn More

    You can learn more in the Create React App documentation.

    To learn React, check out the React documentation.

    Code Splitting

    This section has moved here: https://facebook.github.io/create-react-app/docs/code-splitting

    Analyzing the Bundle Size

    This section has moved here: https://facebook.github.io/create-react-app/docs/analyzing-the-bundle-size

    Making a Progressive Web App

    This section has moved here: https://facebook.github.io/create-react-app/docs/making-a-progressive-web-app

    Advanced Configuration

    This section has moved here: https://facebook.github.io/create-react-app/docs/advanced-configuration

    Deployment

    This section has moved here: https://facebook.github.io/create-react-app/docs/deployment

    npm run build fails to minify

    This section has moved here: https://facebook.github.io/create-react-app/docs/troubleshooting#npm-run-build-fails-to-minify

    Visit original content creator repository
    https://github.com/httpE2Barao/mokup-3D-latinha_Bauhaus

  • trackerslist

    ngosang/trackerslist

    Last update Public trackers Donate PayPal Donate Bitcoin Donate Ethereum

    Updated list of public BitTorrent trackers

    Lists

    These lists are automatically updated every day. Last update 2025/08/25:

    Are you having DNS problems? These lists contain the same trackers but with IP addresses instead of domains:

    Notes

    • A bot automatically checks the trackers and updates the lists.
    • Trackers with the same domain or pointing to the same IP address are removed. Check out the blacklist.
    • Trackers are sorted by popularity and latency (from best to worst).
    • WebSocket trackers (AKA WebTorrent, ws, wss) are supported by few clients. More info.
    • I2P trackers require an I2P Router and a compatible BitTorrent client like: qBittorrent, BiglyBT, Tixati, I2PSnark or libtorrent. More info.
    • Lists with IP addresses can be shorter because Cloudflare IPs are removed.

    Contribute

    • Do you know more public trackers? => Open a new issue
    • Any of the trackers is not working properly? => Open a new issue
    • Make a donation using the banners above.

    Contact

    ngosang [@] hotmail [.es]

    Third-party tools

    Third-party online tools

    • torrenteditor to add these trackers to your .torrent files
    • magnets to add these trackers to your magnet links
    Visit original content creator repository https://github.com/ngosang/trackerslist
  • panda

    From Compilation Database to Compiler-Based Tools.

    Panda is a compilation-independent scheduler
    for pipelining compiler-based tools in parallel
    based on the JSON compilation database.
    It allows you to execute various tools
    on translation units by replaying the compilation process.
    An introduction video to this tool is available from https://youtu.be/YQTg5LsId5k.

    The advantage of Panda include:

    1. Compatible to customize executions of various Compiler-Based Tools
    2. Avoiding interference with the build system;
    3. Scheduling tool execution in a dependency-free manner
      to take full advantages of the system resources.

    Installation

    Panda is a standalone Python script.
    You can install it by directly downloading file panda from this repo.

    $ curl -fsSL https://github.com/Snape3058/panda/raw/demo/panda | sudo tee /usr/bin/panda >/dev/null
    $ sudo chmod +x /usr/bin/panda
    

    Please note that the content on the demo branch is ahead of the main branch,
    and only the code on this branch is for demonstration track revision.
    And the functionalities on this branch will be merged to the main branch
    after this tool paper gets accepted.

    Usage

    Scheduling the execution of compiler-based tools requires the JSON Compilation Database.
    Users can setup the environment according to the introduction from Clang
    (https://clang.llvm.org/docs/HowToSetupToolingForLLVM.html)
    or using tools like Bear (Build EAR).

    Execution of Panda requires
    the CBT Execution Configurations (Section 2.2) to be scheduled,
    as well as optional settings,
    such as number of parallel workers and output path.

    $ panda <configurations> [-f CDB] [-j JOBS] [-o OUTPUT] [options]
    

    Panda provides built-in configurations that cover most scenes
    of executing analyzers and generating desired inputs for analyzers.
    The built-in configurations can be categorized as
    Integrated Tool Configurations,
    Singleton Tool Configurations,
    and Compilation Database Configurations.
    The first two categories have been mentioned in the paper,
    and the last category of configurations are used to
    generate output directly from the compilation database.

    • Example 1: Generating external function map and invocation list
      to path /tmp/csa-ctu-scan under a concurrency of 16 processes.
    $ panda -YM -j 16 -o /tmp/csa-ctu-scan
    
    • Example 2: Executing a customized plugin description /tmp/check/plugin.json
      and store output to path /tmp/check sequentially.
    $ panda --plugin /tmp/check/plugin.json -o /tmp/check
    

    Built-in Compilation Database Configurations

    The compilation database configurations
    transform the input compilation database
    to generate the output file,
    or summarize the output of other builtin configurations for Singleton tools.

    • Generate input file list (-L or --gen-input-file-list):
      a list of all unique files with absolute path.
    • Generate source file list (-F or --gen-source-file-list):
      a list of all unique source files and the header files included.
    • Generate invocation list (-Y or --gen-invocation-list)
      for Cross Translation Unit Analysis of the Clang Static Analyzer
      under on-demand-parsing strategy.
    • Generate external function map (-M or --gen-extdef-mapping)
      for Cross Translation Unit Analysis of the Clang Static Analyzer
      under on-demand-parsing strategy.
    • Generate external function map (-P or --gen-extdef-mapping-ast)
      for Cross Translation Unit Analysis of the Clang Static Analyzer
      under AST-loading strategy.

    Built-in Integrated Tool Configurations

    The Configurations for integrated tools
    mainly generate inputs in desired formats for different analyzers.

    • Test command line arguments and source file syntax (-X or --syntax):
      invoke compiler with -fsyntax-only -Wall
    • Re-compile the source file (-C or --compile):
      invoke compiler with -c
    • Generate preprocessed source file dump (-E or --preprocess):
      invoke compiler with -E
    • Generate Clang PCH format AST dump (-A or --gen-ast):
      invoke the clang compiler with -emit-ast
    • Generate LLVM Bitcode in binary format (-B or --gen-bc):
      invoke the clang compiler with -emit-llvm
    • Generate LLVM Bitcode in text cormat (-R or --gen-ll):
      invoke the clang compiler with -emit-llvm -S
    • Generate assembly dump (-S or --gen-asm):
      invoke compiler with -S
    • Generate dependency description dump (-D or --gen-dep):
      invoke compiler with -M
    • Execute Clang Static Analyzer without Cross Translation Unit Analysis (--analysis)

    Built-in Singleton Tool Configurations

    The builtin configurations for Singleton tools mainly invoke Clang Tooling based tools.

    • Generating external function map (as mentioned above)

    Plugins

    Users can execute customized Integrated and Singleton tools
    with plugins defined with a CBT execution configuration in JSON format.
    In the description,
    field comment is a string for commenting the description,
    field type determines the type of the configuration,
    and object action defines the CBT Execution Configuration object.

    • Example configuration (Figure 4a) of generating LLVM-IR code dumps.

    {
        "comment": "Example plugin for Panda scheduler.",
        "type": "Integrated",
        "action": {
            "prompt": "Generating LLVM-IR code",
            "tool": {
                "c": "clang",
                "c++": "clang++"
            },
            "args": ["-c", "-emit-llvm", "-S"],
            "extension": ".ll"
        }
    }

    For a configuration for Integrated tools, object action has four fields.
    Field prompt defines the prompt string printed during executing the tool.
    Field args is a list of command line arguments to be added during execution.
    Field extension determines the extension name of the output file.

    • Example configuration (Figure 4b) of executing Clang Query
      to identify all goto statements,
      and storing command line output of stdout stream to output file.

    {
        "comment": "Example plugin for Panda scheduler",
        "type": "Singleton",
        "action": {
            "prompt": "Match 'goto' statement",
            "tool": "clang-query",
            "args": ["-c", "match gotoStmt()"],
            "extension": ".clang-query",
            "source": "stdout"
        }
    }

    For a configuration for Singleton tools, object action has five fields.
    Field prompt, args, and extension have the same meaning as
    a configuration for Integrated tools.
    Field tool determines the tool to be executed.
    And field source represents
    the output of which stream will be stored to the output file.
    Please note that, string /path/to/output will be always be replaced to
    the actual output path determined with option -o during execution.

    Publications

    • Ma, Xutong, Jiwei Yan, Jun Yan, and Jian Zhang.
      “Panda: A Concurrent Scheduler for Compiler-Based Tools.”
      In Proceedings of the 33rd ACM SIGSOFT International Symposium
      on Software Testing and Analysis, pp. 1871-1875. 2024.
      https://doi.org/10.1145/3650212.3685311

    Acknowledgments

    • REST team, Institute of Software, Chinese Academy of Sciences
    • Anonymous reviewers of the ISSTA 2024 conference reviewing this paper
    • The tool name, Panda, is inspired by the animated sitcom We Bare Bears
      and the compiler argument recorder Bear (Build EAR).

    Let me know if Panda helps you. Thanks.

    Visit original content creator repository
    https://github.com/SQUARE-RG/panda

  • breastcancer_portal

    End to End AI-ML Workflow — Mammogram Demo

    This is the Flask based frontend app to use breast cancer detection model to classify whether the uploaded pathology images are malign or benign.

    Parts of this demo:

    End-to-End Flow

    Steps

    Create a project “ai-ml-demo” in Openshift. We will be using this throughout the demo.

    oc new-project ai-ml-demo

    Pre-requisites:

    • Install Red Hat Openshift Serverless Operator
    • Create a serviceaccount named “pipeline” to run the pipelines
    • In order to showcase full demo and you do not have external jupyter hub access,please install OpenDataHub operator from OperatorHub and create instance with jupyterhub components. Sample steps below.
    • Click create instance-> go to yaml view and paste the below code and click create.

    apiVersion: kfdef.apps.kubeflow.org/v1
    kind: KfDef
    metadata:
      name: opendatahub
      namespace: ai-ml-demo
    spec:
      applications:
        - kustomizeConfig:
            repoRef:
              name: manifests
              path: odh-common
          name: odh-common
        - kustomizeConfig:
            parameters:
              - name: s3_endpoint_url
                value: s3.odh.com
            repoRef:
              name: manifests
              path: jupyterhub/jupyterhub
          name: jupyterhub
        - kustomizeConfig:
            overlays:
              - additional
            repoRef:
              name: manifests
              path: jupyterhub/notebook-images
          name: notebook-images
        - kustomizeConfig:
            repoRef:
              name: manifests
              path: odh-dashboard
          name: odh-dashboard
      repos:
        - name: kf-manifests
          uri: 'https://github.com/kubeflow/manifests/tarball/v1.3-branch'
        - name: manifests
          uri: 'https://github.com/opendatahub-io/odh-manifests/tarball/v1.1.0'

    Model development

    • Click ODH Dashboard-this is the opensource version of RHODS. As we added only jupyter hub components, we will have that enabled here.
    • On Jupyeter hub card, Click on Launch. You will be directed to the hub, which is Datascience IDE.
    • Select Tensorflow notebook and keep everything else as it is and Click start server.
    • Your jupyter hub environment will be ready.
    • On the top right, click New->Terminal. You will be directed to command line prompt.
    • Here, lets clone our notebooks.
    git clone https://github.com/hanvitha/breastcancer_detection.git
    • Now go back to the hub, you have the notebooks repo locally now to work on.
    • To see how the model is developed, go to *image_processing_model.ipynb. This will take long time to run incase you decide to run this.
    • To test that our model is deployed right, you can run *test_services.ipynb. This can be done successfully once our pipeline run is done.

    Model Deployment in Openshift

    Deploying using a pipeline

    oc apply -f https://raw.githubusercontent.com/hanvitha/breastcancer_pipelines/master/tasks/s2i-model.yaml
    oc apply -f https://raw.githubusercontent.com/hanvitha/breastcancer_pipelines/master/resources/build-image.yaml
    oc apply -f https://raw.githubusercontent.com/hanvitha/breastcancer_pipelines/master/resources/build-source.yaml
    oc apply -f https://raw.githubusercontent.com/hanvitha/breastcancer_pipelines/master/pipeline/deploy-pipelines.yaml

    If you have tekton installed, run

    tkn pipeline start bcd --serviceaccount='pipeline' --showlog

    Click enter to choose default options till the pipeline runs

    You can also go to pipeline in Openshift console and Start Run with all defaults

    Frontend app Installation in Openshift

    From Openshift console:

    • In Openshift Console, Go to Developer perspective
    • Make sure you are in ai-ml-demo project
    • Click on +Add
    • Choose from Git
    • Copy paste the current repo
    • Keep everything default and click Create

    OR from CLI

    oc new-app -n ai-ml-demo https://github.com/hanvitha/breastcancer_portal.git
    oc expose service/breastcancerportal

    Adding Monitoring and Metrics

    Connecting Prometheus

    oc new-app prom/prometheus
    oc expose service/prometheus
    
    curl https://raw.githubusercontent.com/hanvitha/breastcancer_detection/master/mlworkflows/prometheus.yaml -o prometheus.yaml
    oc create configmap prom --from-file=prometheus.yaml
    oc set volume deployment/prometheus --add -t configmap --configmap-name=prom -m /etc/prometheus/prometheus.yml --sub-path=prometheus.yaml
    
    oc rollout status -w deployment/prometheus

    Add sum(pipeline_predictions_total) by (app, value) to monitoring metrics

    Connecting Grafana

    oc new-app grafana/grafana
    oc expose service/grafana

    Add prometheus dashboard in grafana using:

    http://prometheus.ai-ml-demo:9090

    Add sum(model_pipeline_predictions_total) by (app, value) to monitoring metrics and create your own dashboard in Prometheus and Grafana

    Sample board to use : https://raw.githubusercontent.com/hanvitha/breastcancer_detection/master/Breast%20Cancer%20Model%20Metrics-grafana_dashboard.json

    Working it all together

    • In order to test the app is all up and running, download images from testimages folder and download the images(you can clone the repo if needed)
    • Our model is around 70% accurate so it can detect malignancy most of the times but not always.
    • From UI, upload/drop the test image. and click on Get Prediction.
    • You will see the prediction below the button. It can take a couple of seconds as it needs to process the image.
    • Image names with postfix _0 are benign -absent of cancer cells, and _1 are malign for your reference. You can change names if you like.
    • You can see how your model is working from grafana dashboard.

    Thanks for going through my demo.This is purely my personal demo created to show Opensource value to my customers.
    Please reach out to me on my LinkedIn

    Visit original content creator repository
    https://github.com/hanvitha/breastcancer_portal

  • IvyBot

    IvyBot

    Multi-purpose Discord bot written in C#

    Invite

    Click here to add the bot to a server of your choice

    Building

    Can be built on Windows, Linux, and macOS using the .NET 5 SDK or can be built directly through Visual Studio or Visual Studio Code

    Running and hosting

    Clone the repository with git clone https://github.com/ivydrinkscoffee/IvyBot.git then rename App.config.example to App.config and edit it accordingly to your Discord and Lavalink environment

    <?xml version="1.0" encoding="utf-8"?>
    <configuration>
        <startup>
            <supportedRuntime version="v4.0" sku="net5.0" />
        </startup>
      <appSettings>
        <add key="Token" value="replace with your bot token" />
        <add key="Prefix" value="replace with a prefix of your choice" />
        <add key="Host" value="replace with the set lavalink address" />
        <add key="Port" value="replace with the set lavalink port" />
        <add key="Password" value="replace with the set lavalink password" />
      </appSettings>
    </configuration>

    Remember that if you are running your Lavalink instance on Heroku the port will always be 80 regardless of the port you set

    Future plans

    Cleaning up the rest of MusicService but nothing big at the moment, feel free to suggest any ideas!

    Credits

    Discord.Net

    Victoria

    Newtonsoft.Json

    Special thanks

    Lavalink

    some random api

    Visit original content creator repository
    https://github.com/ivydrinkscoffee/IvyBot

  • learn_flutter_theme

    [This page in Persian | فارسی]

    Preview

    learn_flutter_theme

    Learn flutter theme in this project. This project has a web app: https://app.yazdi.dev/learn_flutter_theme/

    What is this project

    This project contains dark and light themes, plus English and Persian localizations.

    How we can change the app based on the selected theme?

    You can change the current state of localization or theme by wrapping MaterialApp with InheritedWidget or anything else like provider or even setState the MaterialApp widget. Here we used an inherited widget:

    class _ModelBindingScope extends InheritedWidget {
      const _ModelBindingScope({
        Key? key,
        required this.modelBindingState,
        required Widget child,
      }) : super(key: key, child: child);
    
      final _ModelBindingState modelBindingState;
    
      @override
      bool updateShouldNotify(_ModelBindingScope oldWidget) => true;
    }

    and made it as a MaterialApp parent

    ModelBinding(
      initialModel: OurOptions(
        themeMode: ThemeMode.system,
        textScaleFactor: systemTextScaleFactorOption,
        platform: defaultTargetPlatform,
      ),
      child: Builder(
        builder: (context) {
          return MaterialApp(
            home: const OurHomePage(),
          );
        },
      ),
    );

    How to create the dark and light theme?

    It’s so simple, just create a class and define your theme’s properties based on your design for example like this in Figma: Figma

    We have two options here: Create the whole MaterialTheme with all properties or just change what you need by copyWith the MaterialTheme, here we used the second option by overriding what we need:

    static const _lightFillColor = Colors.black;
    static const _darkFillColor = Colors.white;
    
    static final Color _lightFocusColor = Colors.black.withOpacity(0.12);
    static final Color _darkFocusColor = Colors.white.withOpacity(0.12);
    
    static final ThemeData _lightThemeData = ThemeData.light();
    static final ThemeData _darkThemeData = ThemeData.dark();
    
    static ThemeData lightThemeData(BuildContext context) =>
      themeData(_lightThemeData, context, lightColorScheme, _lightFocusColor);
    
    static ThemeData darkThemeData(BuildContext context) =>
      themeData(_darkThemeData, context, darkColorScheme, _darkFocusColor);
    
    static ThemeData themeData(ThemeData themeData, BuildContext context,
      ColorScheme colorScheme, Color focusColor) {
        return themeData.copyWith(
          colorScheme: colorScheme,
          textTheme: isFarsiLocale(context)
              ? _faTextTheme(themeData.textTheme, colorScheme.onPrimary)
              : _textTheme(themeData.textTheme, colorScheme.onPrimary),
        );
    }

    As you can see we passed flutterThemeData.light() and ThemeData.dark() with our colorScheme and _faTextTheme and _textTheme based on the localization, and finally used themeData.copyWith to change what we need.

    We have two main properties that we have to customize, otherwise our theme is nothing but a MaterialTheme:

    • ColorSchema based on light and dark theme:
    static ColorScheme lightColorScheme = const ColorScheme.dark().copyWith(
        primary: const Color(0xFFB93C5D),
        primaryVariant: const Color(0xFF117378),
        secondary: const Color(0xFFEFF3F3),
        secondaryVariant: const Color(0xFFFAFBFB),
        background: const Color(0xFFE6EBEB),
        onSurface: const Color(0xFF241E30),
        brightness: Brightness.light,
    );
    
    static ColorScheme darkColorScheme = const ColorScheme.light().copyWith(
        primary: const Color(0xFFFF8383),
        primaryVariant: const Color(0xFF1CDEC9),
        secondary: const Color(0xFF4D1F7C),
        secondaryVariant: const Color(0xFF451B6F),
        background: const Color(0xFF241E30),
        surface: const Color(0xFF1F1929),
        onBackground: Colors.white.withOpacity(0.05),
        onSurface: _darkFillColor,
        brightness: Brightness.dark,
    );

    As you can see there are multiple colors that each one of them used for multiple purposes for flutter widgets and again we override what we need to change of flutter’s light and dark colorScheme.

    • TextTheme that we separated based on localization since we wanted to use a Persian font:
    static const _regular = FontWeight.w400;
    static const _medium = FontWeight.w500;
    static const _semiBold = FontWeight.w600;
    static const _bold = FontWeight.w700;
    
    static TextTheme _textTheme(TextTheme textTheme, Color color) {
      return textTheme
          .copyWith(
            bodyText1: GoogleFonts.montserrat(
              fontWeight: _regular,
              fontSize: 14.0,
              textStyle: textTheme.bodyText1,
            ),
            headline4: GoogleFonts.montserrat(
              fontWeight: _bold,
              fontSize: 20.0,
              textStyle: textTheme.headline4,
            ),
            subtitle1: GoogleFonts.montserrat(
              fontWeight: _medium,
              fontSize: 16.0,
              textStyle: textTheme.subtitle1,
            ),
            caption: GoogleFonts.oswald(
              fontWeight: _semiBold,
              fontSize: 16.0,
              textStyle: textTheme.caption,
            ),
            button: GoogleFonts.montserrat(
              fontWeight: _semiBold,
              fontSize: 14.0,
              textStyle: textTheme.button,
            ),
          )
          .apply(bodyColor: color);
    }
    static TextTheme _faTextTheme(TextTheme textTheme, Color color) {
      return textTheme
          .copyWith(
            bodyText1: textTheme.bodyText1!.copyWith(
              fontWeight: _regular,
              fontSize: 14.0,
              fontFamily: 'IRANSans-Regular',
            ),
            headline4: textTheme.headline4!.copyWith(
              fontWeight: _bold,
              fontSize: 20.0,
              fontFamily: 'IRANSans-Bold',
            ),
            subtitle1: textTheme.subtitle1!.copyWith(
              fontWeight: _medium,
              fontSize: 16.0,
              fontFamily: 'IRANSans-Medium',
            ),
            caption: textTheme.caption!.copyWith(
              fontWeight: _semiBold,
              fontSize: 16.0,
              fontFamily: 'IRANSans-SemiBold',
            ),
            button: textTheme.button!.copyWith(
              fontWeight: _semiBold,
              fontSize: 14.0,
              fontFamily: 'IRANSans-Medium',
            ),
          )
          .apply(bodyColor: color);
    }

    This is the place where we need to import our custom fonts. We used a GoogleFont package for our English text and a Persian font for our Persian text. Just don’t forget to put your font in the pubspec.yaml:

    assets:
      - fonts/google_fonts/
    fonts:
      - family: IRANSans-Medium
        fonts:
          - asset: fonts/IRANSans-Medium.ttf
      - family: IRANSans-Regular
        fonts:
          - asset: fonts/IRANSans-Regular.ttf
      - family: IRANSans-SemiBold
        fonts:
          - asset: fonts/IRANSans-SemiBold.ttf
      - family: IRANSans-Bold
        fonts:
          - asset: fonts/IRANSans-Bold.ttf

    and don’t forget if you have multiple FontWeight, you should also add the other big fonts like IRANSans-SemiBold and IRANSans-Bold

    Everything else should be defined by your requirements in Figma like

    themeData.copyWith(
      appBarTheme: AppBarTheme(
        textTheme: isFarsiLocale(context)
            ? _faTextTheme(themeData.textTheme, colorScheme.onPrimary)
            : _textTheme(themeData.textTheme, colorScheme.onPrimary),
        color: colorScheme.background,
        elevation: 0,
        iconTheme: IconThemeData(color: colorScheme.primary),
        brightness: colorScheme.brightness,
      ),
      bottomAppBarTheme: BottomAppBarTheme(
        color: colorScheme.primary,
      ),
      buttonTheme: ButtonThemeData(
        textTheme: ButtonTextTheme.primary,
        colorScheme: colorScheme,
      ),
      floatingActionButtonTheme: themeData.floatingActionButtonTheme
          .copyWith(foregroundColor: colorScheme.primary),
      iconTheme: IconThemeData(color: colorScheme.onPrimary),
      toggleableActiveColor: colorScheme.primary,
      indicatorColor: colorScheme.onPrimary,
      primaryColor: colorScheme.primary,
      scaffoldBackgroundColor: colorScheme.background,
      highlightColor: Colors.transparent,
      accentColor: colorScheme.primary,
      snackBarTheme: SnackBarThemeData(
        behavior: SnackBarBehavior.floating,
        backgroundColor: Color.alphaBlend(
          _lightFillColor.withOpacity(0.80),
          _darkFillColor,
        ),
        contentTextStyle: isFarsiLocale(context)
            ? _faTextTheme(themeData.textTheme, colorScheme.onPrimary)
                .subtitle1!
                .apply(color: _darkFillColor)
            : _textTheme(themeData.textTheme, colorScheme.onPrimary)
                .subtitle1!
                .apply(color: _darkFillColor),
      ),
    );

    How we can know about localization in our theme?

    Here we have a helper method:

    bool isFarsiLocale(BuildContext context) {
      return (OurOptions.of(context)!.locale?.languageCode ?? false) == 'fa';
    }

    If you pass a context to the theme, you can check localization based on an inherited widget that we created at the first step It could be a provider or a bloc but you definitely need a context to access your selected localization (Or maybe you’re using getX which I haven’t tried :D).

    Then all you have to do is a simple if else:

    themeData.copyWith(
      colorScheme: colorScheme,
      textTheme: isFarsiLocale(context)
          ? _faTextTheme(themeData.textTheme, colorScheme.onPrimary)
          : _textTheme(themeData.textTheme, colorScheme.onPrimary),
    );

    Is there any way to change the theme for a specific widget and its children

    Yes, just wrap your widget by a Theme widget and you can define everything again:

    Theme(
        data: ThemeData(backgroundColor: Colors.red),
        child: OurChild(),
    ),

    You could also again use your previous ThemeData by using Theme.of(context) and change it what you need by using Theme.of(context).copyWith(). Flutter always looks for your closet ThemeData that’s why it returned the one you define in you MaterialApp not the flutter’s ThemeData.

    You can always use style or theme properties like ButtonTheme widget and flutter apply them first, for example if we want to change one text’s style:

    Text(
      OurLocalizations.of(context)!.ourText,
      style: Theme.of(context).textTheme.headline1,
    )

    Final Speech

    In this project, I tried to explain theming as simply as I could. The flutter theme is simple as well as powerful. So clone this project and try to customize it with new ideas and don’t forget the PRs are most welcomed. By the way, it is so much better to read flutter documentation: Use themes to share colors and font styles, Theme class API and ThemeData class API

    Thanks for your support by starring this repository.

    Visit original content creator repository https://github.com/yazdidev/learn_flutter_theme
  • guit

    🔨 The development of the new major version 2 is being conducted at the moment. Build Status Coverage Status Dependency Status Join the chat at https://gitter.im/es-guit


    GUIT

    The JavaScript framework for testing web UI

    npm package

    Installation

    # Local installation:
    npm install --save-dev guit
    
    # Global installation:
    npm install -g guit

    Usage

    To run your tests in command line

    guit --help
    #
    #  Usage: guit [options]
    #
    #  Options:
    #
    #    -h, --help               output usage information
    #    --spec-dir <dir>         Specify spec's dir to find
    #    --spec-files <regex>     Specify spec's file regex to run
    #    --helper-dir <dir>       Specify helper's dir to find
    #    --helper-files <regex>   Specify helper's file regex to import
    #    --junit-filename <file>  Specify junit results file to save
    #

    Run the tests using

    guit --spec-dir ./example/spec/ --spec-files \\-spec\\.js$

    To run your tests using npm, you may specify scripts in package.json

    {
      "scripts": {
        "test": "guit --spec-dir ./example/spec/ --spec-files \\-spec\\.js$"
      }
    }

    Run the tests using npm test

    Configuration

    You may specify the config in .guitrc

    {
        "helperDir": "helper",
        "helperFiles": ".*-helper.js",
        "specDir": "spec",
        "specFiles": [
            ".*-spec.js",
            ".*-spec.json"
        ],
        "junitFilename": "junitresults.xml"
    }

    Alternatively, you may specify the field guit in your package.json

    {
      "guit": {
        "helperDir": "helper",
        "helperFiles": ".*-helper.js",
        "specDir": "spec",
        "specFiles": [
          ".*-spec.js",
          ".*-spec.json"
        ],
        "junitFilename": "junitresults.xml"
      }
    }

    And specify scripts in package.json

    {
      "scripts": {
        "test": "guit"
      }
    }

    Global methods

    describe("<SUITE DESCRIPTION>", <FUNCTION>);
    it("<CASE DESCRIPTION>", <FUNCTION>); (support async await)
    beforeAll(<FUNCTION>); (support async await)
    beforeEach(<FUNCTION>); (support async await)
    afterEach(<FUNCTION>); (support async await)
    afterAll(<FUNCTION>); (support async await)
    expect(<ACTUAL>)

    guit uses expect

    Usage methods for create specs

    describe('Suite 1:', function() {
    
        beforeAll(function() {
            this.config = {};
        });
    
        beforeEach(function() {
            this.data = {};
        });
    
        it('Spec 1', function() {
            expect({}).toEqual({});
        });
    
        afterEach(function() {
            delete this.data;
        });
    
        afterAll(function() {
            delete this.config;
        });
    
    });

    Usage with async await

    import { runServer, stopServer } from 'path/to/server';
    import { sendRequest } from 'path/to/client'
    
    describe('Suite 1:', function() {
    
        beforeAll(async function() {
            await runServer();
        });
    
        it('Spec 1', async function() {
            let response1 = await sendRequest({a: 1});
            let response2 = await sendRequest({a: 2});
            expect(response1).toNotEqual(response2);
        });
    
        afterAll(async function() {
            await stopServer();
        });
    
    });

    Usage json file for create specs

    {
      "title": "Suite 1:",
      "beforeAll": "beforeAllForSuite1",
      "afterAll": "afterAllForSuite1",
      "beforeEach": "beforeEachForSuite1",
      "afterEach": "afterEachForSuite1",
      "specs": [
        {
          "title": "Open page:",
          "it": [
            {
              "action": "open",
              "args": [ "http://127.0.0.1:3000/" ]
            },
            {
              "action": "sleep",
              "args": [ 1000 ]
            },
            {
              "action": "checkView",
              "args": [ "main-page" ]
            }
          ]
        },
        {
          "title": "Click button:",
          "it": [
            {
              "action": "mouseEvent",
              "args": [ "click", 110, 300 ]
            },
            {
              "action": "sleep",
              "args": [ 1000 ]
            },
            {
              "action": "checkView",
              "args": [ "main-page-001" ]
            }
          ]
        }
      ]
    }

    Helpers

    Helper file example

    export async function open(url) {
        await this.browser.open(url);
    }
    
    export async function sleep(time) {
        await this.browser.sleep(time);
    }
    
    export async function mouseEvent(type, x, y) {
        await this.browser.mouseEvent(type, x, y);
    }
    
    export async function keyboardEvent(type, key) {
        await this.browser.keyboardEvent(type, key);
    }
    
    export async function beforeAllForSuite1 {
        // start this.browser
        // start this.server
    }
    
    export async function afterAllForSuite1 {
        // stop this.browser
        // stop this.server
    }
    
    export async function beforeEachForSuite1 {
        // ...
    }
    
    export async function afterEachForSuite1 {
        // ...
    }

    Tools

    Browser

    import { Browser } from 'guit';

    Initializing

    let browserInstance = await new Browser({
        width: <WIDTH px>,
        height: <WIDTH px>,
        checkTimeout: <TIME ms>,
        doneTimeout: <TIME ms>
    });

    Methods

    Open page in browser

    await browserInstance.open(<URL>);

    Close page

    await browserInstance.close();

    Close browser

    await browserInstance.exit();

    Render view into image

    await browserInstance.render(<IMAGE PATH>);

    Sleep

    await browserInstance.sleep(<TIME ms>);

    Fire mouse event

    await browserInstance.mouseEvent(
        <TYPE>,
        <POSITION X>,
        <POSITION X>,
        <BUTTON left|right>
    );

    Fire keyboard event

    await browserInstance.keyboardEvent(<TYPE>, <KEY>);

    Return snapshot of computed style

    await browserInstance.getSnapshot(<IGNORE ATTRIBUTES (array)>);

    Save snapshot of computed style

    await browserInstance.saveSnapshot(<PATH TO FILE>, <SNAPSHOT>);

    Load snapshot of computed style

    await browserInstance.loadSnapshot(<PATH TO FILE>);

    Compare current snapshot with saved snapshot

    await browserInstance.diffSnapshot(
        <ACTUAL SNAPSHOT>,
        <ORIGINAL SNAPSHOT>,
        <DEVIATION ATTRIBUTES (object)>
    );

    Compare current snapshot with saved snapshot

    await browserInstance.diffView(
        <PATH TO ACTUAL IMAGE>,
        <PATH TO EXPECTED IMAGE>,
        <PATH TO DIFF IMAGE>
    );

    Usage Browser

    import { runServer } from '../server';
    import { Browser } from 'guit';
    
    describe('Page specs:', function() {
    
        beforeEach(async function() {
            this.closeServer = await runServer(3179);
            this.browser = await new Browser({
                width: 1280,
                height: 1024,
                checkTimeout: 100,
                doneTimeout: 5000,
                args: [
                    '--proxy=http://127.0.0.1:8080' // http proxy server
                ]
            });
        });
    
        it('page spec', async function() {
            await this.browser.open('http://localhost:3179/');
            // await this.browser.render('example/spec/test3-page.png');
            let diff = await this.browser.diffView(
                'tmp/test3-page.png',
                'example/spec/test3-page.png',
                'tmp/test3-page-diff.png',
            );
            expect(diff.percentage).toBe(0);
        });
    
        afterEach(function() {
            this.browser.close();
            this.closeServer();
        });
    
    });

    Supported args

    Add custom reporter

    import { addReporter } from 'guit';

    Usage addReporter(CustomReporterClass)

    export default class CustomReporterClass {
    
        constructor(config) { /* ... */}
    
        started() { /* ... */}
    
        suiteStarted(suite) { /* ... */}
    
        specStarted(spec) { /* ... */}
    
        specDone(spec) { /* ... */}
    
        suiteDone(suite) { /* ... */ }
    
        done() { /* ... */ }
    
    }

    Dependencies

    babel-cli * babel-plugin-transform-object-rest-spread * babel-polyfill * babel-preset-es2015 * babel-preset-es2017 * colors * commander * deep-object-diff * expect * image-diff * phantom * recursive-readdir-sync * xmlbuilder * express * nodemon

    Note on Patches/Pull Requests

    1. Fork the project.
    2. Make your feature addition or bug fix.
    3. Send me a pull request.
    Visit original content creator repository https://github.com/uxter/guit